按钮使用
按钮用于处理用户操作。它截取触摸事件,并将消息发送到目标对象。
圆角矩形按钮

在 xib 中的按钮属性
您可以在Utility area(实用区域,窗口的右侧)的属性检查器的更改 xib 按钮属性。
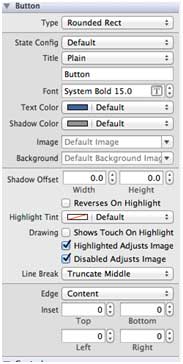
按钮类型
- UIButtonTypeCustom
- UIButtonTypeRoundedRect
- UIButtonTypeDetailDisclosure
- UIButtonTypeInfoLight
- UIButtonTypeInfoDark
- UIButtonTypeContactAdd
重要的属性
- imageView
- titleLabel
重要的方法
+ (id)buttonWithType:(UIButtonType)buttonType
- (UIImage *)backgroundImageForState:(UIControlState)state
- (UIImage *)imageForState:(UIControlState)state
- (void)setTitle:(NSString *)title forState:(UIControlState)state
- (void)addTarget:(id)target action:(SEL)action forControlEvents: (UIControlEvents) controlEvents添加自定义方法 addDifferentTypesOfButton
-(void)addDifferentTypesOfButton
{
    // A rounded Rect button created by using class method
    UIButton *roundRectButton = [UIButton buttonWithType:
    UIButtonTypeRoundedRect];
    [roundRectButton setFrame:CGRectMake(60, 50, 200, 40)];
    // sets title for the button
    [roundRectButton setTitle:@"Rounded Rect Button" forState:
    UIControlStateNormal];
    [self.view addSubview:roundRectButton];

    UIButton *customButton = [UIButton buttonWithType: UIButtonTypeCustom];
    [customButton setBackgroundColor: [UIColor lightGrayColor]];
    [customButton setTitleColor:[UIColor blackColor] forState:
    UIControlStateHighlighted];
    //sets background image for normal state
    [customButton setBackgroundImage:[UIImage imageNamed:
    @"Button_Default.png"]
    forState:UIControlStateNormal];
    //sets background image for highlighted state
    [customButton setBackgroundImage:[UIImage imageNamed:
    @"Button_Highlighted.png"]
    forState:UIControlStateHighlighted];
    [customButton setFrame:CGRectMake(60, 100, 200, 40)];
    [customButton setTitle:@"Custom Button" forState:UIControlStateNormal];
    [self.view addSubview:customButton];

    UIButton *detailDisclosureButton = [UIButton buttonWithType:
    UIButtonTypeDetailDisclosure];
    [detailDisclosureButton setFrame:CGRectMake(60, 150, 200, 40)];
    [detailDisclosureButton setTitle:@"Detail disclosure" forState:
    UIControlStateNormal];
    [self.view addSubview:detailDisclosureButton];

    UIButton *contactButton = [UIButton buttonWithType:
    UIButtonTypeContactAdd];
    [contactButton setFrame:CGRectMake(60, 200, 200, 40)];
    [self.view addSubview:contactButton];

    UIButton *infoDarkButton = [UIButton buttonWithType:
    UIButtonTypeInfoDark];
    [infoDarkButton setFrame:CGRectMake(60, 250, 200, 40)];
    [self.view addSubview:infoDarkButton];

    UIButton *infoLightButton = [UIButton buttonWithType:
    UIButtonTypeInfoLight];
    [infoLightButton setFrame:CGRectMake(60, 300, 200, 40)];
    [self.view addSubview:infoLightButton];
}
注意:
我们将命名为"Button_Default.png"和"Button_Highlighted.png"的个图像添加到我们的项目,可以通过将图像拖到列出了我们的项目文件的导航区域来完成。
在 ViewController.m 中更新 viewDidLoad,如下所示
(void)viewDidLoad
{
	[super viewDidLoad];
	//The custom method to create our different types of button is called
	[self addDifferentTypesOfButton];
	//Do any additional setup after loading the view, typically from a nib
}
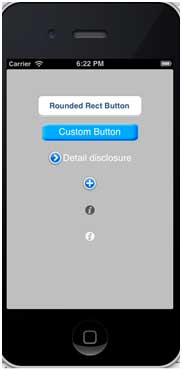
输出
现在当我们运行应用程序时我们就会得到下面的输出: